Basement waterproofing might not seem exciting, but it’s like a silent guardian for your home’s safety. Your house’s strength relies on a solid foundation, and your basement plays a crucial role in that. Water is persistent; it can sneak into your basement through tiny openings. Gradually, this can harm your home’s structure, causing expensive fixes and putting your family at risk.
If your home isn’t waterproofed correctly, it can get damaged by unpredictable natural events. This kind of damage can affect the air you breathe inside, your home’s value, and your peace of mind. You don’t have to be an expert to keep your home safe from water. With the right information and some work, you can make your home strong against rain and other elements. Keep reading, and we’ll show you how to waterproof your basement walls and floors to keep your home safe.
Understanding the Importance of Basement Waterproofing
Basement waterproofing is very important. If you don’t do it, your basement can get wet and cause lots of trouble. This can lead to mold, cracks in your house, and higher bills for heating and cooling. So, by waterproofing, you make sure your basement stays dry, your house is strong, and your costs stay low. In other words, it’s like giving your house a strong raincoat.
Preventing Mold and Mildew
When your basement isn’t waterproofed, moisture can build up, creating a perfect environment for mold and mildew. These little troublemakers aren’t just bad for your health; they can also harm your home’s structure. Breathing in mold spores can lead to breathing problems and allergies. To keep your living space healthy, make sure your basement stays dry and free from excess moisture.
Protecting Your Home’s Foundation
Your home’s foundation is like its strong backbone. If water can seep into it due to a lack of waterproofing, it weakens over time. This can cause cracks that put your home’s structure at risk. Fixing foundation damage can be expensive and time-consuming. To avoid this, make sure your basement is waterproofed to keep your home’s foundation strong.
Safekeeping Your Belongings
Many of us store valuable things in our basements like furniture, electronics, and sentimental items. Without proper waterproofing, water can sneak in and damage or ruin these possessions, causing financial losses. By waterproofing your basement, you’re protecting your investments and ensuring your cherished belongings are safe from water damage.
Boosting Energy Efficiency
A waterproofed basement also helps you save on energy bills. Excess moisture in your basement can mess with your insulation, making your heating and cooling systems work harder, which costs more money. By keeping your basement dry, you not only maintain a comfy living space but also cut down on energy expenses.
Increasing Home Resale Value
If you ever decide to sell your home, a waterproofed basement can make a big difference in its value. Potential buyers worry about water damage and its consequences. With a dry, well-protected basement, your home becomes more attractive to buyers, potentially fetching a higher selling price. It’s an investment that pays off when it’s time to sell your property.
Bringing Peace of Mind
When your basement is effectively waterproofed, you can relax. You won’t have to stress about sudden water leaks during heavy rain or snowmelt. It lets you enjoy your home without worrying about water-related issues.
Basement waterproofing isn’t just about keeping your basement dry. It’s about protecting your health, your home’s strength, your belongings, your budget, and your overall well-being. Understanding why basement waterproofing is essential empowers you to take the right steps to secure your home and create a safe, cozy living space for you and your family.
Common Causes of Basement Water Damage
- Poor Drainage: When the area around your home doesn’t direct water away correctly, it gathers near your foundation. This can cause water to seep into your basement through any cracks.
- Cracks in the Foundation: Over time, a house’s foundation might develop cracks because of soil shifts or weather changes. These cracks can become paths for water to enter, especially during heavy rain.
- Leaky Window Wells: Window wells bring light into your basement and help you access windows. But if they’re not sealed and drained properly, they can let water in. Rainwater can collect in the well and find its way into your basement.
- Clogged Gutters: Gutters are vital for keeping rain away from your home. If they get clogged with leaves or debris, they can overflow, causing water to run down your walls and saturate the soil near your foundation. This raises the risk of water getting into your basement.
- Hydrostatic Pressure: In areas with high water tables, the pressure from groundwater can push water through any cracks or porous spots in your foundation. This can lead to basement flooding.
Understanding these common causes of basement water problems is the first step in preventing them. By taking the right actions, homeowners can keep their basements dry and their homes safe from water damage.
DIY Basement Waterproofing: Step-by-Step Guide
Step 1: Identify the Problem Areas
When you begin waterproofing your basement, the initial step is finding out where the issues are. Start by examining your basement for any signs of problems. Keep an eye out for water stains, strange smells, or any cracks you can see. These clues will help you recognize the challenges you’re dealing with. By catching these problems early, you can act to ensure your basement stays dry, and your home stays secure.
Step 2: Gather the Necessary Tools and Materials
When you’re ready to waterproof your basement, it’s essential to gather the right tools and materials. First, make a checklist to be sure you have everything you need. You’ll want sealants, waterproofing materials, and safety gear to keep you protected. These tools will help you do the job correctly and make your basement water-tight. So, before you begin, take some time to collect all the necessary items.
Step 3: Exterior Waterproofing
Exterior waterproofing is a smart way to keep water out of your basement. It’s like putting on a raincoat for your home. By sealing up any cracks or weak spots on the outside walls and adding a drainage system, you make sure water doesn’t even get close to your basement. Imagine it as a shield, protecting your home from rain and groundwater. When you have strong exterior waterproofing, you can stop water before it becomes a problem inside. It’s like having a sturdy fortress that keeps your basement dry and cozy.
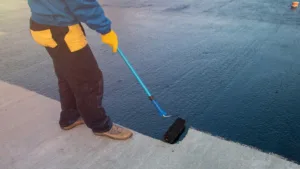
Step 4: Interior Waterproofing
This step is like the backup plan for keeping your basement dry. It’s all about working from the inside to prevent water from causing trouble. When you see signs of water seeping through the walls or floors, interior waterproofing comes to the rescue. It usually involves using sealants, special paints, and drainage systems inside your basement. These act as a shield to keep water out. So, when the outside defenses can’t stop water, the interior waterproofing steps up and protects your basement from getting wet. It’s like having an extra layer of security for your home.
Step 5: Proper Insulation
Proper insulation is a crucial part of basement waterproofing. It helps in keeping the basement environment comfortable and dry. By adding insulation to the walls and floors, you create a barrier that prevents moisture from getting inside. This means less chance of mold or mildew growth. Additionally, insulation helps regulate the temperature, making your basement more energy-efficient. When it’s warmer in the winter and cooler in the summer, you save on energy bills. So, make sure to insulate your basement as part of your waterproofing efforts, and you’ll create a cozy, dry space that’s more pleasant to be in.
Step 6: Maintaining Your Waterproofed Basement
To keep your waterproofed basement in good shape, regular upkeep is the key. Here’s what you can do. First, take a look from time to time. Check for any problems, like cracks or leaks. Then, make sure your drainage system is clear and doing its job. Remove any debris, and test your sump pump to be sure it’s working well. Also, remember to put on more sealant when it’s necessary since it can wear out over time. By doing these things, you can have a dry and safe basement for a long time.
Step 7: Install a Sump Pump
When dealing with frequent standing water or flooding, consider adding a sump pump to actively remove water from your home. There are two types of pumps to choose from: pedestal pumps, with the motor above the water level, and submersible pumps, which go in the water. Pedestal pumps are cheaper and simpler to set up but not as strong. Submersible pumps are pricier and usually need a special pit, but they’re more efficient at getting rid of water.
DIY vs. Professional Basement Waterproofing
When it comes to keeping your basement dry, there are two main paths: DIY or hiring professionals.
DIY Basement Waterproofing
For the DIY route, you can use sealants, epoxies, or waterproof paints. You can find these at your local hardware store for less than $100, and you won’t need fancy tools to put them on. You can also adjust the landscape around your home to help water flow away from your foundation. These simple steps can prevent water issues in the future.
Professional Basement Waterproofing
On the other hand, if your basement is really wet, especially if it’s entirely below ground in an area with a high water table, basic fixes might not be enough. In such cases, you might need more advanced drainage systems, like a French drain or drain tile. This usually means calling a plumber. Also, if your foundation has serious problems, it’s crucial to bring in a professional contractor. While fixing the foundation can be expensive, it’s necessary to safeguard your home.
How To Save on Basement Waterproofing
Here are some money-saving tips for basement waterproofing:
- If your basement is only slightly damp, consider sealing cracks yourself before seeking professional help.
- Ensure your basement is thoroughly dry and clean before applying waterproofing products or hiring experts.
- Invest in high-quality products whenever possible. While they may cost more upfront, they can save you money by reducing the need for future repairs.
- Take preventive measures, like maintaining well-functioning gutters and promptly addressing any potential leaks.
- If you plan to finish your basement, include waterproofing in the basement finishing budget to cut down on labor costs.
- Keep an eye on foundation cracks and fix them promptly to prevent more severe and costly structural problems.
Frequently Asked Questions (FAQs)
What are the signs that my basement needs waterproofing?
If you’re wondering when your basement needs waterproofing, watch out for some signs. First, pay attention to wet spots or water stains on the walls or floor. These can be a clue. Musty, moldy smells in the basement are another sign. Cracks in the walls can also let water in, so look out for those. If you see peeling paint or efflorescence (that’s when you spot a white, powdery substance on the walls), it might be time to think about waterproofing. Finally, if you’re dealing with regular leaks or flooding, that’s a clear signal that waterproofing is needed to keep your basement dry and safe.
Can I waterproof my basement without professional help?
Yes, you can definitely waterproof your basement without professional assistance. Many basic waterproofing tasks, like sealing cracks and using waterproof paint, are doable on your own. It’s essential to follow guides and get the right materials, but with some effort, it’s possible. However, for more complex issues or if you’re uncertain, it’s wise to consult a professional to make sure it’s done right. It’s a balance between what you feel comfortable doing and what requires expertise.
How much does DIY basement waterproofing cost?
When it comes to the cost of DIY basement waterproofing, it can be quite affordable. You won’t need to break the bank. Usually, you can find sealants, paints, and other materials at your local hardware store for less than $100. It’s a cost-effective choice. However, if you need to purchase more advanced equipment or hire professionals, the cost might go up. So, keeping things simple and doing it yourself can save you money in the long run. Just remember, your investment will help protect your home from potential water damage.
How long does it take to waterproof a basement?
The time it takes to waterproof a basement can vary. It depends on how big the basement is, what kind of work needs to be done, and if you’re doing it yourself or hiring professionals. Smaller basements might take a few days, while larger ones could take a week or more. If you’re only sealing cracks or applying waterproof paint, it can be quicker. But if you need more extensive work, like installing drainage systems, it will take longer. It’s essential to plan for some extra time to allow for drying and curing of materials. So, it’s a bit like cooking – it depends on the recipe, and you need to follow the steps carefully to get the best results.
Are there any eco-friendly basement waterproofing options?
Certainly, when it comes to keeping your basement dry in an environmentally friendly way, there are some options to consider. One choice is using water-based sealants or coatings that have fewer harmful chemicals, which is better for the planet. Additionally, you can explore exterior methods like French drains and proper grading to prevent water from entering your basement. These eco-friendly approaches can help you maintain a dry basement while being kinder to the environment. It’s a win-win situation!
Conclusion
A dry basement isn’t just a nice thing to have; it’s super important for a healthy home. When you use this DIY guide, you’re being smart by protecting your property and making sure your home is safe and cozy. So, don’t wait! Start your basement waterproofing project now, and enjoy the peace of mind that comes with a dry, secure, and comfy basement.